Nagiosとは、企業で安心して使用できる(注1)オープンソースの監視システムだ。
このブログを書いている現在時点でのNagiosの最新版は3.2.0だ。
しかし、日本語パッチの対応が3.1.0までなので、あえて3.1.0をインストールする。
Nagios本体のインストール情報はたくさんある。
ここで書く必要もないのだろうが、あえて書いてみたい。
サーバOSは、CentOS 5.3 である。
※注1:NRIオープンソースマップ(2007年4月版)
ダウンロード
まずは、必要なものをダウンロードしよう。
●Nagios本体:nagios-3.1.0.tar.gz(SourceForgeのNagiosプロジェクトページ)
●日本語パッチ:nagios-3.1.0-ja-utf8.patch.gz(SourceForgeのNagios-JPプロジェクトページ)
Nagios本体の最新版であれば本家Nagiosサイトからダウンロードできるが、旧バージョンはダウンロードページのOlder releasesのリンクからSourceForgeのNagiosプロジェクトページへ行ってダウンロードするようになっている。
ダウンロードしたtarballは、どこで解凍してもいいが、ここでは/usr/local/src に置くものとする。
インストールマニュアル
Nagiosのインストールマニュアルは、Nagios本体のtarball(nagios-3.1.0.tar.gz)に含まれている。
tarballを解凍すると以下にfedora用のマニュアルがある。
./nagios-3.1.0/html/docs/quickstart-fedora.html
今回は、CentOSにインストールするので、fedora用のマニュアルを参考にするといいだろう。
NagiosのマニュアルではSELinuxを使用していることを前提に記述されているが、ここではSELinuxを使わないことを前提に書いている。
また、全ての作業は特に断りがない限りrootアカウントで行うものとする。
システム要求
Nagiosのインストールマニュアルによれば、以下の通り。
・Apache
・GCC compiler
・GD development libraries
そこで、次のようにyum を使ってインストールを行う。
# yum install httpd

# yum install gcc

# yum install glibc glibc-common

# yum install gd gd-devel |
Nagiosの実行アカウントとグループの作成
Nagiosの実行アカウント(nagios)とWebインターフェースのCGIがNagiosの外部コマンドファイルにコマンドを書き込むのに必要なグループ(nagcmd)を作成する。
また、このグループにNagiosの実行アカウント(nagios)とApacheの実行アカウント(apache)も追加しておく。
※赤字部分は入力したパスワード(実際は表示されない)
# useradd -m nagios

# passwd nagios

Changing password for user nagios.

New UNIX password: nagiospasswd

Retype new UNIX password: nagiospasswd

passwd: all authentication tokens updated successfully.

# groupadd nagcmd

# usermod -a -G nagcmd nagios

# usermod -a -G nagcmd apache
|
Nagiosのインストール
Ver3では、Apacheの設定も追加してくれるので、Ver2よりも便利になっている。
まずは、Nagiosのtarballを解凍し、Nagios-JPの日本語パッチを適用してからコンフィグレーションを実行する。
# cd /usr/local/src

# tar xvfz nagios-3.1.0.tar.gz

# cd nagios-3.1.0

# gzip -dc ../nagios-3.1.0-ja-utf8.patch.gz | patch -p0

# ./configure --with-command-group=nagcmd

checking for a BSD-compatible install... /usr/bin/install -c

checking build system type... i686-pc-linux-gnu

checking host system type... i686-pc-linux-gnu

checking for gcc... gcc

checking for C compiler default output file name... a.out

checking whether the C compiler works... yes

checking whether we are cross compiling... no

checking for suffix of executables...

checking for suffix of object files... o

checking whether we are using the GNU C compiler... yes
<中略>
config.status: include/config.h is unchanged

config.status: creating include/snprintf.h

config.status: include/snprintf.h is unchanged

config.status: creating include/cgiutils.h

config.status: include/cgiutils.h is unchanged
Creating sample config files in sample-config/ ...


*** Configuration summary for nagios 3.1.0 01-25-2009 ***:
 General Options:

 -------------------------

        Nagios executable:  nagios

        Nagios user/group:  nagios,nagios

       Command user/group:  nagios,nagcmd

            Embedded Perl:  no

             Event Broker:  yes

        Install ${prefix}:  /usr/local/nagios

                Lock file:  ${prefix}/var/nagios.lock

   Check result directory:  ${prefix}/var/spool/checkresults

           Init directory:  /etc/rc.d/init.d

  Apache conf.d directory:  /etc/httpd/conf.d

             Mail program:  /bin/mail

                  Host OS:  linux-gnu
 Web Interface Options:

 ------------------------

                 HTML URL:  http://localhost/nagios/

                  CGI URL:  http://localhost/nagios/cgi-bin/

Traceroute (used by WAP):  /bin/traceroute


Review the options above for accuracy.  If they look okay,

type 'make all' to compile the main program and CGIs.
|
特にエラーメッセージもなく、最後のメッセージが出れば、ここまでは問題ない。
上記のメッセージから、Nagiosは/usr/local/nagios にインストールされ、Apache用の設定ファイルが/etc/httpd/conf.d に作られることがわかる。
この設定で問題がなければ、引き続き ‘make all’ を実行する。
# make all
<省略>
*** Compile finished ***
If the main program and CGIs compiled without any errors, you

can continue with installing Nagios as follows (type 'make'

without any arguments for a list of all possible options):
  make install

     - This installs the main program, CGIs, and HTML files
  make install-init

     - This installs the init script in /etc/rc.d/init.d
  make install-commandmode

     - This installs and configures permissions on the

       directory for holding the external command file
  make install-config

     - This installs *SAMPLE* config files in /usr/local/nagios/etc

       You'll have to modify these sample files before you can

       use Nagios.  Read the HTML documentation for more info

       on doing this.  Pay particular attention to the docs on

       object configuration files, as they determine what/how

       things get monitored!
  make install-webconf

     - This installs the Apache config file for the Nagios

       web interface
*** Support Notes *******************************************
If you have questions about configuring or running Nagios,

please make sure that you:
     - Look at the sample config files

     - Read the HTML documentation

     - Read the FAQs online at http://www.nagios.org/faqs
before you post a question to one of the mailing lists.

Also make sure to include pertinent information that could

help others help you.  This might include:
     - What version of Nagios you are using

     - What version of the plugins you are using

     - Relevant snippets from your config files

     - Relevant error messages from the Nagios log file
For more information on obtaining support for Nagios, visit:
       http://www.nagios.org/support/
*************************************************************
Enjoy.
|
特にエラーがなければ、引き続き ‘make install’ から ‘make install-webconf’ までを順に実行する。
# make install
<省略>
*** Main program, CGIs and HTML files installed ***
You can continue with installing Nagios as follows (type 'make'

without any arguments for a list of all possible options):
  make install-init

     - This installs the init script in /etc/rc.d/init.d
  make install-commandmode

     - This installs and configures permissions on the

       directory for holding the external command file
  make install-config

     - This installs sample config files in /usr/local/nagios/etc


# make install-init

/usr/bin/install -c -m 755 -d -o root -g root /etc/rc.d/init.d

/usr/bin/install -c -m 755 -o root -g root daemon-init /etc/rc.d/init.d/nagios
*** Init script installed ***


# make install-config

/usr/bin/install -c -m 775 -o nagios -g nagios -d /usr/local/nagios/etc

/usr/bin/install -c -m 775 -o nagios -g nagios -d /usr/local/nagios/etc/objects

/usr/bin/install -c -b -m 664 -o nagios -g nagios sample-config/nagios.cfg /usr/local/nagios/etc/nagios.cfg

/usr/bin/install -c -b -m 664 -o nagios -g nagios sample-config/cgi.cfg /usr/local/nagios/etc/cgi.cfg

/usr/bin/install -c -b -m 660 -o nagios -g nagios sample-config/resource.cfg /usr/local/nagios/etc/resource.cfg

/usr/bin/install -c -b -m 664 -o nagios -g nagios sample-config/template-object/templates.cfg /usr/local/nagios/etc/objects/templates.cfg

/usr/bin/install -c -b -m 664 -o nagios -g nagios sample-config/template-object/commands.cfg /usr/local/nagios/etc/objects/commands.cfg

/usr/bin/install -c -b -m 664 -o nagios -g nagios sample-config/template-object/contacts.cfg /usr/local/nagios/etc/objects/contacts.cfg

/usr/bin/install -c -b -m 664 -o nagios -g nagios sample-config/template-object/timeperiods.cfg /usr/local/nagios/etc/objects/timeperiods.cfg

/usr/bin/install -c -b -m 664 -o nagios -g nagios sample-config/template-object/localhost.cfg /usr/local/nagios/etc/objects/localhost.cfg

/usr/bin/install -c -b -m 664 -o nagios -g nagios sample-config/template-object/windows.cfg /usr/local/nagios/etc/objects/windows.cfg

/usr/bin/install -c -b -m 664 -o nagios -g nagios sample-config/template-object/printer.cfg /usr/local/nagios/etc/objects/printer.cfg

/usr/bin/install -c -b -m 664 -o nagios -g nagios sample-config/template-object/switch.cfg /usr/local/nagios/etc/objects/switch.cfg
*** Config files installed ***
Remember, these are *SAMPLE* config files. You'll need to read

the documentation for more information on how to actually define

services, hosts, etc. to fit your particular needs.


# make install-commandmode

/usr/bin/install -c -m 775 -o nagios -g nagcmd -d /usr/local/nagios/var/rw

chmod g+s /usr/local/nagios/var/rw
*** External command directory configured ***


# make install-webconf

/usr/bin/install -c -m 644 sample-config/httpd.conf /etc/httpd/conf.d/nagios.conf
*** Nagios/Apache conf file installed ***
|
これでインストールは完了だ。
Nagiosの起動
次は、Nagiosを起動させる。
chkconfigで管理できるようにしておくと便利だ。
# chkconfig --add nagios

# chkconfig --list nagios

nagios          0:off   1:off   2:off   3:on    4:on    5:on    6:off

# service nagios start

Starting nagios: done.
|
Basic認証アカウントの作成
NagiosのWebインターフェースにはBasic認証が使われる。
そのためのログインアカウントを作成する。
Nagiosの特権アカウント(nagiosadmin)を作成する。
※赤字部分は入力したパスワード(実際は表示されない)
# htpasswd -c /usr/local/nagios/etc/htpasswd.users nagiosadmin

New password: adminpasswd

Re-type new password: adminpasswd

Adding password for user nagiosadmin
|
Apacheの設定と起動
インストール直後のApacheは、ServerNameの設定がされていない。
このため、ServerNameの設定を行う。
下の例では、ServerName nagios.example.comとなっているが、実際にはインストールしたサーバのURLかIPアドレスを指定する。
# vi /etc/httpd/conf/httpd.conf
ServerName nagios.example.com
|
次にApacheを起動する。
httpdについては、chkconfigで管理できるようにしておくと便利だ。
# chkconfig --add httpd

# chkconfig --list httpd

httpd           0:off   1:off   2:off   3:on    4:on    5:on    6:off

# service httpd start

httpd を起動中: [ OK ] |
Webインターフェースへのアクセス
ブラウザで以下のアドレスにアクセスする。
下の例では、nagios.example.comとなっているが、実際にはインストールしたサーバのURLかIPアドレスを指定する。
httpd://nagios.example.com/nagios/
Basic認証のユーザ名とパスワードの入力を要求されるので、Nagiosの特権アカウント(nagiosadmin)とパスワード(adminpasswd)を入力する。

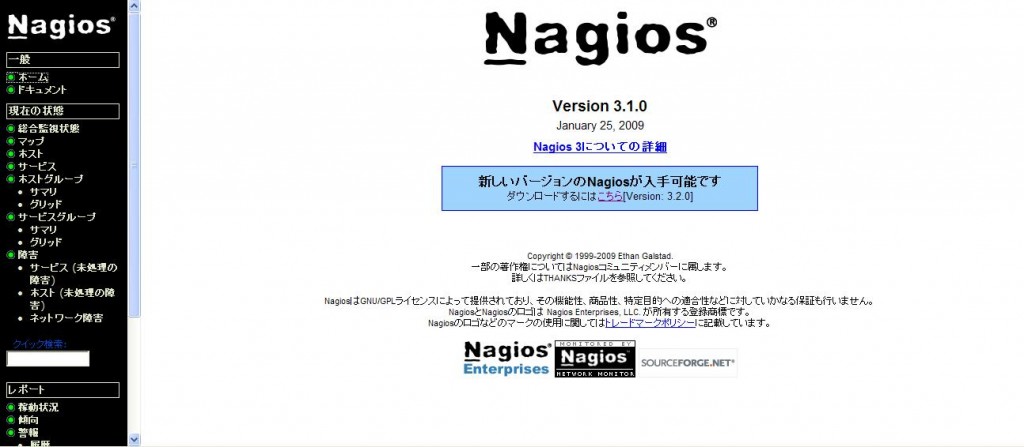
図1:NagiosのWebインターフェースのTOP画面
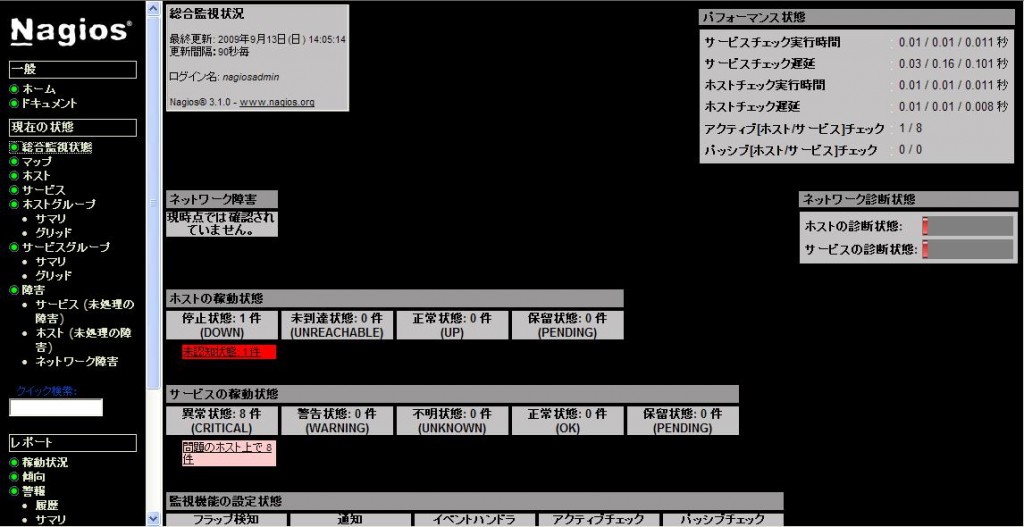
左側のサイドメニューから、総合監視状態をクリックすると、現在の監視状況の確認ができる。
もっとも、まだ監視プラグインをインストールしていないので、エラーが発生している。

図2:Nagiosの総合監視状態画面
Categories: Nagios


