今回は、NagiosでSNMPトラップを受信する方法を考える。
ネットワーク機器の監視によく利用されるSNMPだが、NagiosはSNMPマネージャとして使用するように設計されていないため、SNMPトラップの受信機能はないが、パッシブ監視を利用して実装することができる。
そのためには、まずNagiosサーバにSNMPトラップを受信する機能と受信したSNMPトラップをNagiosが検知できる形(監視ステータス)に変換する機能を実装しなければならない。
SNMPトラップを受信する機能はsnmptrapdを使用し、受信したSNMPトラップをNagiosが検知できる形(監視ステータス)に変換する機能はSNMPTT(SNMP Trap Translator)を使用する。
snmptrapdは、net-snmpに含まれている。
このブログを書いている現在時点でのSNMPTTの最新版は1.3 だ。
以前、インストールしたNagios(3.1.0)にインストールを行う。
サーバOSは、CentOS 5.3 である。
SNMPTTを使用したパッシブ監視の仕組みは以下の通りだ。

図1:SNMPTTとパッシブ監視
①イベントの発生
監視対象サーバで、LINK DOWNなどのイベントが発生するとSNMPクライアントがSNMPトラップを送信する。
②SNMPトラップ
SNMPトラップをNagios監視サーバに送信する。
③SNMPトラップを監視結果に変換
SNMPトラップのOIDを監視ステータスに変換する。
④監視結果を登録
監視結果(監視ステータス)を外部コマンドファイル(/usr/local/nagios/var/rw/nagios.cmd)に登録(書き込み)する。
⑤パッシブ監視
Nagios側から外部コマンドファイルに監視結果が登録されたかを定期的にチェックする。
登録されていれば、その監視結果をNagiosに取り込む。
ダウンロード
今回必要なものは以下の通りだ。
●SNMPTT : snmptt_1.3.tgz (SNMPTTサイトのダウンロードページ)
ダウンロードしたtarballは、/usr/local/src に置くものとする。
インストールマニュアル
SNMPTTのインストールマニュアルは、SNMPTTサイトのドキュメントを見るか、ダウンロードしたtarballにも含まれている。
tarballを解凍すると、以下にインストールマニュアルがある。
./snmptt_1.3/docs/snmptt.html
また、全ての作業は特に断りがない限りrootアカウントで行うものとする。
システム要求
・Perl 5.6.1 以上。
・Net-SNMP(snmptrapd)
・以下のPerlモジュール
 Text::ParseWords		Getopt::Long		Posix
 Config::IniFiles		Time::HiRes		Sys::Hostname
 File::Basename		Text::Balanced		Socket
 Sys::Syslog		DBI			DBD::MySQL
 DBD::PgPP		DBD::ODBC		Net-SNMP Perl
 Thread			Digest::MD5
PerlとNet-SNMP(snmptrapd)は要求を満たしている。
Net-SNMP(snmptrapd)はインストールされているがアップデートしておく。
# yum install net-snmp*

<省略>

==========================================================================================
 Package                          Arch       Version                    Repository   Size
==========================================================================================
Installing:
 net-snmp-devel                   i386       1:5.3.2.2-9.el5_5.1        updates     1.9 M
 net-snmp-devel                   x86_64     1:5.3.2.2-9.el5_5.1        updates     2.0 M
 net-snmp-perl                    x86_64     1:5.3.2.2-9.el5_5.1        updates     197 k
Updating:
 lm_sensors                       x86_64     2.10.7-9.el5               base        525 k
 lm_sensors                       i386       2.10.7-9.el5               base        511 k
 net-snmp                         x86_64     1:5.3.2.2-9.el5_5.1        updates     702 k
 net-snmp-libs                    x86_64     1:5.3.2.2-9.el5_5.1        updates     1.3 M
 net-snmp-libs                    i386       1:5.3.2.2-9.el5_5.1        updates     1.3 M
 net-snmp-utils                   x86_64     1:5.3.2.2-9.el5_5.1        updates     188 k
Installing for dependencies:
 beecrypt                         i386       4.1.2-10.1.1               base        116 k
 beecrypt-devel                   i386       4.1.2-10.1.1               base        160 k
 elfutils-devel                   i386       0.137-3.el5                base         61 k
 elfutils-devel-static            i386       0.137-3.el5                base        122 k
 elfutils-libelf-devel            i386       0.137-3.el5                base         24 k
 elfutils-libelf-devel-static     i386       0.137-3.el5                base         66 k
 elfutils-libs                    i386       0.137-3.el5                base        193 k
 lm_sensors-devel                 i386       2.10.7-9.el5               base         77 k

<省略>
|
snmptrapdのスタートアップスクリプトの変更と起動を行う。
snmptrapdは、-On オプションを付けて起動させる必要がある。
-On オプションは、snmptrapdにOIDsを数値フォーマットで渡し、SNMPTTがシンボル名を数値フォーマットに変換しなければならないのを防ぐ。
# vi /etc/init.d/snmptrapd
変更前:
OPTIONS="-Lsd -p /var/run/snmptrapd.pid"
変更後:
OPTIONS="-On -Lsd -p /var/run/snmptrapd.pid"

# service snmptrapd start
snmptrapd を起動中:                                        [  OK  ]
|
次にPerlモジュールの確認を行う。
# find `perl -e 'print join(" ", @INC)'` -type f -name "*.pm" |grep Text/ParseWords.pm
/usr/lib/perl5/5.8.8/Text/ParseWords.pm

# find `perl -e 'print join(" ", @INC)'` -type f -name "*.pm" |grep Getopt/Long.pm
/usr/lib/perl5/5.8.8/Getopt/Long.pm

# find `perl -e 'print join(" ", @INC)'` -type f -name "*.pm" |grep POSIX.pm
/usr/lib64/perl5/5.8.8/x86_64-linux-thread-multi/POSIX.pm

# find `perl -e 'print join(" ", @INC)'` -type f -name "*.pm" |grep Config/IniFiles.pm

# find `perl -e 'print join(" ", @INC)'` -type f -name "*.pm" |grep Time/HiRes.pm
/usr/lib64/perl5/5.8.8/x86_64-linux-thread-multi/Time/HiRes.pm

# find `perl -e 'print join(" ", @INC)'` -type f -name "*.pm" |grep Sys/Hostname.pm
/usr/lib64/perl5/5.8.8/x86_64-linux-thread-multi/Sys/Hostname.pm

# find `perl -e 'print join(" ", @INC)'` -type f -name "*.pm" |grep File/Basename.pm
/usr/lib/perl5/5.8.8/File/Basename.pm

# find `perl -e 'print join(" ", @INC)'` -type f -name "*.pm" |grep Text/Balanced.pm
/usr/lib/perl5/5.8.8/Text/Balanced.pm

# find `perl -e 'print join(" ", @INC)'` -type f -name "*.pm" |grep Socket.pm
/usr/lib64/perl5/vendor_perl/5.8.8/x86_64-linux-thread-multi/APR/Socket.pm
/usr/lib64/perl5/5.8.8/x86_64-linux-thread-multi/Socket.pm
/usr/lib64/perl5/5.8.8/x86_64-linux-thread-multi/IO/Socket.pm

# find `perl -e 'print join(" ", @INC)'` -type f -name "*.pm" |grep Sys/Syslog.pm
/usr/lib64/perl5/5.8.8/x86_64-linux-thread-multi/Sys/Syslog.pm

# find `perl -e 'print join(" ", @INC)'` -type f -name "*.pm" |grep DBI.pm
/usr/lib64/perl5/vendor_perl/5.8.8/x86_64-linux-thread-multi/DBI.pm
/usr/lib64/perl5/vendor_perl/5.8.8/x86_64-linux-thread-multi/Bundle/DBI.pm

# find `perl -e 'print join(" ", @INC)'` -type f -name "*.pm" |grep DBD/mysql.pm
/usr/lib64/perl5/vendor_perl/5.8.8/x86_64-linux-thread-multi/DBD/mysql.pm
/usr/lib64/perl5/vendor_perl/5.8.8/x86_64-linux-thread-multi/Bundle/DBD/mysql.pm

# find `perl -e 'print join(" ", @INC)'` -type f -name "*.pm" |grep DBD/PgPP

# find `perl -e 'print join(" ", @INC)'` -type f -name "*.pm" |grep DBD/ODBC.pm

# find `perl -e 'print join(" ", @INC)'` -type f -name "*.pm" |grep Thread.pm
/usr/lib/perl5/5.8.8/Thread.pm

# find `perl -e 'print join(" ", @INC)'` -type f -name "*.pm" |grep Digest/MD5.pm
/usr/lib64/perl5/5.8.8/x86_64-linux-thread-multi/Digest/MD5.pm
|
まぁ、言うまでもないが、findでシステム要求のPerlモジュールを探しているので、コマンド入力後に何も出てこない場合はPerlモジュールがないということだ。
以上から、以下のPerlモジュールが足りないことがわかった。
Config::IniFiles
DBD::PgPP
DBD::ODBC
続いて、足りないPerlモジュールのインストールを行う。
# yum install perl-Config-IniFiles perl-DBD-PgPP perl-DBD-ODBC

<省略>

===============================================================================================================
 Package                            Arch                 Version                       Repository         Size
===============================================================================================================
Installing:
 perl-Config-IniFiles               noarch               2.56-1.el5.rf                 dag                36 k
 perl-DBD-ODBC                      x86_64               1.23-1.el5.rf                 dag               263 k
 perl-DBD-PgPP                      noarch               0.08-1.el5.rf                 dag                28 k

<省略>
|
SNMPTTのインストール
SNMPTTのインストールは必要となるファイルをコピーすることで行う。
# tar xvfz snmptt_1.3.tgz
# cd snmptt_1.3
# cp snmptt /usr/sbin/
# chmod 755 /usr/sbin/snmptt
# cp snmptthandler /usr/sbin/
# chmod 755 /usr/sbin/snmptthandler
# cp snmptt.ini /etc/snmp/
|
次に、SNMPTTの起動方法を選択し、設定を行う。
設定は、/etc/snmp/snmptrapd.conf に記述する。
SNMPTTは、スタンドアローン・モードとデーモン・モードが選択できる。
それぞれ、好きなほうを選べばいいだろう。
また、/etc/snmp/snmptrapd.conf が存在しない場合は(恐らく存在しないだろう)、作成してしまって構わない。
# cd /etc/snmp
# vi snmptrapd.conf
authCommunity log,execute,net public
スタンドアローン・モードの場合
traphandle default /usr/sbin/snmptt
デーモン・モードの場合
traphandle default /usr/sbin/snmptthandler
|
authCommunity は、snmptrapdがSNMPトラップを受信するコミュニティ名を指定する。
上記の例では、コミュニティ名:publicのSNMPトラップを受信することになる。
これを記述しないとsnmptrapdがSNMPトラップの受信拒否を行い、/var/log/messagesに以下のようなエラーログを出力する。
Jul 19 06:11:08 engine snmptrapd[29726]: No access configuration – dropping trap.
スタートアップスクリプトをコピーし、サービスを起動する。
# cd /usr/local/src/snmptt_1.3/
# cp snmptt-init.d /etc/init.d/snmptt
# chkconfig --add snmptt
# chkconfig --level 2345 snmptt on
# service snmptt start
|
SNMPトラップがSNMPTTで処理されなかった場合は、/var/log/snmpttunknown.logに記録されるようにsnmptt.iniの変更を行う。
# cd /etc/snmp
# vi snmptt.ini
変更前:
unknown_trap_log_enable = 0
変更後:
unknown_trap_log_enable = 1
|
snmptt.conf を作成する。
snmptt.conf は、snmpttconvertmibを使って、MIBファイルから作成する。
SNMPTTは、これがないとSNMPトラップを処理できない。
通常CentOSでは、/usr/share/snmp/mibsにMIBファイルがある。
今回は、/usr/share/snmp/mibs/IF-MIB.txt からsnmptt.conf を作成してみた。
作成するsnmptt.conf はわかりやすいようにsnmptt.conf.IF-MIBというファイル名にした。
# cd /etc/snmp
# /usr/local/src/snmptt_1.3/snmpttconvertmib --in /usr/share/snmp/mibs/IF-MIB.txt --out snmptt.conf.IF-MIB


*****  Processing MIB file *****

snmptranslate version: NET-SNMP version: 5.3.2.2
severity: Normal

File to load is:        /usr/share/snmp/mibs/IF-MIB.txt
File to APPEND TO:      ./snmptt.conf.IF-MIB

MIBS environment var:   /usr/share/snmp/mibs/IF-MIB.txt
mib name: IF-MIB


Processing MIB:         IF-MIB
#
skipping a TRAP-TYPE / NOTIFICATION-TYPE line - probably an import line.
#
Line: 1105
NOTIFICATION-TYPE: linkDown
Variables: ifIndex ifAdminStatus ifOperStatus
Enterprise: snmpTraps
Looking up via snmptranslate: IF-MIB::linkDown
OID: .1.3.6.1.6.3.1.1.5.3
#
Line: 1117
NOTIFICATION-TYPE: linkUp
Variables: ifIndex ifAdminStatus ifOperStatus
Enterprise: snmpTraps
Looking up via snmptranslate: IF-MIB::linkUp
OID: .1.3.6.1.6.3.1.1.5.4


Done

Total translations:        2
Successful translations:   2
Failed translations:       0
|
作成されたsnmptt.conf.IF-MIBは以下のようになっている。
# cat snmptt.conf.IF-MIB
#
#
#
#
MIB: IF-MIB (file:/usr/share/snmp/mibs/IF-MIB.txt) converted on Sun Jul 11 02:39:33 2010 using snmpttconvertmib v1.3
#
#
#
EVENT linkDown .1.3.6.1.6.3.1.1.5.3 "Status Events" Normal
FORMAT A linkDown trap signifies that the SNMP entity, acting in $*
SDESC
A linkDown trap signifies that the SNMP entity, acting in
an agent role, has detected that the ifOperStatus object for
one of its communication links is about to enter the down
state from some other state (but not from the notPresent
state).  This other state is indicated by the included value
of ifOperStatus.
Variables:
  1: ifIndex
  2: ifAdminStatus
  3: ifOperStatus
EDESC
#
#
#
EVENT linkUp .1.3.6.1.6.3.1.1.5.4 "Status Events" Normal
FORMAT A linkUp trap signifies that the SNMP entity, acting in an $*
SDESC
A linkUp trap signifies that the SNMP entity, acting in an
agent role, has detected that the ifOperStatus object for
one of its communication links left the down state and
transitioned into some other state (but not into the
notPresent state).  This other state is indicated by the
included value of ifOperStatus.
Variables:
  1: ifIndex
  2: ifAdminStatus
  3: ifOperStatus
EDESC
|
作成されたsnmptt.conf.IF-MIBに、さらにEXEC文を挿入してNagiosへトラップ情報と監視ステータスを渡さなければならない。
監視ステータスに関しては、システムが自動的に決定することができないため、人間が判断してEXEC文でNagiosに送ってやらなければならない。
しかし、監視ステータスはOIDごとに決めて、EXEC文で記述される。
つまり、『LinkDownのトラップはCRITICALである』と一度決めてしまうと(EXEC文で設定すると)LinkDownのトラップを受信した場合には常にCRITICALをNagiosに送信するようになるため、この設定の決定は重要となる。
また、Nagiosのtarballには監視結果をNagiosの外部コマンドファイル(/usr/local/nagios/var/rw/nagios.cmd)に登録するためのシェル(submit_check_result)が用意されている。
これを /usr/local/nagios/libexec/eventhandlers にコピーして使うと便利だ。
# cat /usr/local/src/nagios-3.1.0/contrib/eventhandlers/submit_check_result
#!/bin/sh

# SUBMIT_CHECK_RESULT
# Written by Ethan Galstad (egalstad@nagios.org)
# Last Modified: 02-18-2002
#
# This script will write a command to the Nagios command
# file to cause Nagios to process a passive service check
# result.  Note: This script is intended to be run on the
# same host that is running Nagios.  If you want to
# submit passive check results from a remote machine, look
# at using the nsca addon.
#
# Arguments:
#  $1 = host_name (Short name of host that the service is
#       associated with)
#  $2 = svc_description (Description of the service)
#  $3 = return_code (An integer that determines the state
#       of the service check, 0=OK, 1=WARNING, 2=CRITICAL,
#       3=UNKNOWN).
#  $4 = plugin_output (A text string that should be used
#       as the plugin output for the service check)
#

echocmd="/bin/echo"

CommandFile="/usr/local/nagios/var/rw/nagios.cmd"

# get the current date/time in seconds since UNIX epoch
datetime=`date +%s`

# create the command line to add to the command file
cmdline="[$datetime] PROCESS_SERVICE_CHECK_RESULT;$1;$2;$3;$4"

# append the command to the end of the command file
`$echocmd $cmdline >> $CommandFile`

# mkdir /usr/local/nagios/libexec/eventhandlers
# cp -p /usr/local/src/nagios-3.1.0/contrib/eventhandlers/submit_check_result /usr/local/nagios/libexec/eventhandlers/
|
submit_check_resultの引数は、監視対象ホスト名、サービス監視名、ステータスコード、プラグインのOUTPUTとなっている。
これを利用してEXEC文を作成する。
# vi snmptt.conf.IF-MIB
#
#
#
#
MIB: IF-MIB (file:/usr/share/snmp/mibs/IF-MIB.txt) converted on Sun Jul 11 02:39:33 2010 using snmpttconvertmib v1.3
#
#
#
EVENT linkDown .1.3.6.1.6.3.1.1.5.3 "Status Events" Normal
FORMAT A linkDown trap signifies that the SNMP entity, acting in $*
EXEC /usr/local/nagios/libexec/eventhandlers/submit_check_result $r LINKDOWN 2 "A linkDown trap signifies that the SNMP entity, acting in $*"
SDESC
A linkDown trap signifies that the SNMP entity, acting in
an agent role, has detected that the ifOperStatus object for
one of its communication links is about to enter the down
state from some other state (but not from the notPresent
state).  This other state is indicated by the included value
of ifOperStatus.
Variables:
  1: ifIndex
  2: ifAdminStatus
  3: ifOperStatus
EDESC
#
#
#
EVENT linkUp .1.3.6.1.6.3.1.1.5.4 "Status Events" Normal
FORMAT A linkUp trap signifies that the SNMP entity, acting in an $*
EXEC /usr/local/nagios/libexec/eventhandlers/submit_check_result $r LINKUP 2 "A linkUp trap signifies that the SNMP entity, acting in an $*"
SDESC
A linkUp trap signifies that the SNMP entity, acting in an
agent role, has detected that the ifOperStatus object for
one of its communication links left the down state and
transitioned into some other state (but not into the
notPresent state).  This other state is indicated by the
included value of ifOperStatus.
Variables:
  1: ifIndex
  2: ifAdminStatus
  3: ifOperStatus
EDESC
|
submit_check_result に渡した $r は、監視対象ホスト名もしくはIPアドレスとなる。
次に、SNMPTTに今作成したsnmptt.conf.IF-MIBを認識させる必要がある。
それには、snmptt.ini に設定を追加する。
# vi snmptt.ini

<省略>

[TrapFiles]
# A list of snmptt.conf files (this is NOT the snmptrapd.conf file).  The COMPLETE path
# and filename.  Ex: '/etc/snmp/snmptt.conf'
snmptt_conf_files = <<END
/etc/snmp/snmptt.conf.IF-MIB
END
|
他のsnmptt.confを作成した場合には、改行してENDの上に記述していけばいい。
もちろん、/etc/snmp/snmptt.confの中にいろんなMIBの設定を追加してもOKだ。
そうすれば、いちいちsnmptt.iniを編集する手間が省ける。
最後にSNMPTTを再起動しておく必要がある。
# service snmptt restart
snmptt を停止中:                                           [  OK  ]
snmptt を起動中:                                           [  OK  ]
|
また、セキュリティへの配慮として、デーモン・モードでSNMPTTを起動する場合は、root以外のアカウントで実行する。
snmptt.iniの以下の設定を好きなアカウントに変更する。
daemon_uid = snmptt
デフォルトでは、上記のようにsnmpttアカウントで実行されるようになっている。
snmpttアカウントは別途作成する必要があるが、作成しない場合は、rootで実行される。
動作確認
まずは、前回『NSCA(2.7.2)のインストール』の動作確認でパッシブ監視テスト用に作ったサービス監視をコピーする。
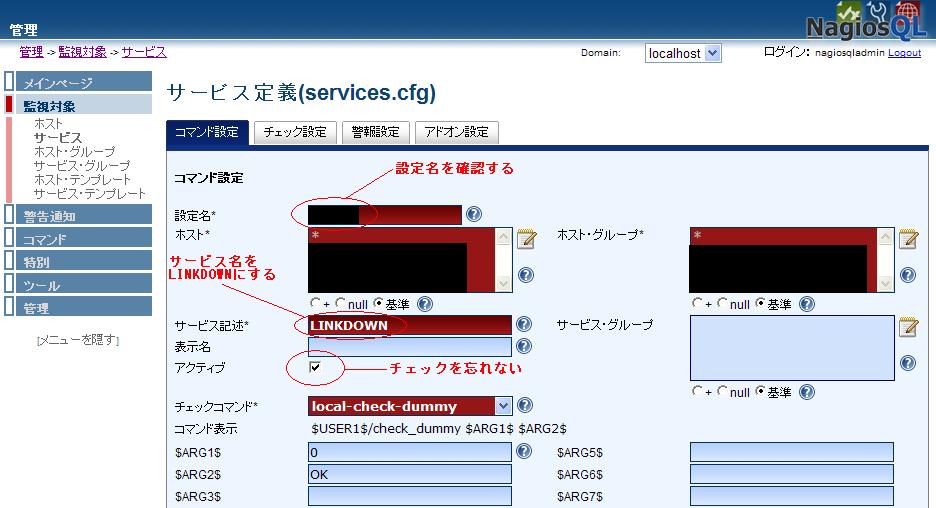
コピーしたら、図2のようにサービス名をLINKDOWNに変更する。

図2:SNMP監視テスト(1)
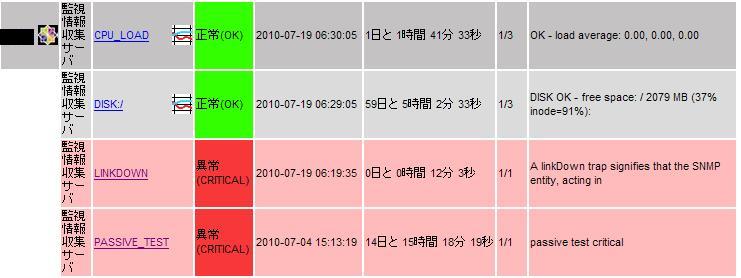
きちんと設定すれば図3のLINKDOWNのようになる。

図3:SNMP監視テスト(2)
それでは早速SNMP監視のテストを行う。
監視対象サーバから以下のようにsnmptrapコマンドを使って、Nagios側のsnmptrapdにLINKDOWNのOIDを送信する。
# snmptrap -v 2c -c public 監視エンジンのIPアドレス '' .1.3.6.1.6.3.1.1.5.3
|
本来は、以下のようなフォーマットだが、今回は[ data bindingの値群…]部分を省略した。
snmptrap -v [2c|3] 共通オプション 時刻 トラップOID [ data bindingの値群…]
成功すれば、図4のようにLINKDOWNがCRITICALとなる。

図4:SNMP監視テスト(3)
Categories: Nagios ,SNMPTT


